
Professional web design news.
Envato Tuts+ Tutorials made available the next content. These people consistently offer content of the highest quality so are certainly one of my favorite must-watch blogs. I’m guessing you’ll find it interesting.

In this tutorial, you’ll learn how to make a book in InDesign. Once created, InDesign book templates can be adapted with your own cover design, type formatting and text content to create a unique and professional book layout designs every time.
We’ll cover a wide range of book design techniques in this tutorial, from how to put together the inside pages to how to design a book cover.
Here we’ll put together a standard-sized paperback (softcover) book, complete with inside pages and a full wraparound cover.
If you’re looking to self-publish your own books and sell them online, or are making your first steps into professional cover design for clients, this guide will introduce you to the essentials of creating book templates.
Looking for a quick start? InDesign templates are great value and easy to adapt. You can find a huge range of customizable InDesign book cover templates and book layout templates on Envato Elements and GraphicRiver.
-

50+ InDesign Templates Every Designer Should Own

What You’ll Need to Create Your Book Template
We’ll be using Adobe InDesign to create the artwork for the cover and to typeset the inside pages. You’ll also need to download the following fonts for the inside pages template:
- Addington CF
- George Sans
To reproduce the cover design pictured, you’ll also need to download the following fonts and graphics:
- Photo of a woman rushing
- Retro dots backgrounds
- Agave font
Install the fonts on your computer, and you’re ready to start creating your book format template.
1. How to Create the Inside Pages for Your Book Template
Step 1
Open InDesign and go to File > New > Document.
Choose Print from the options at the top of the New Document window.
Set the Width of the page to 5 in and Height to 8 in. Increase the Number of Pages to 16 (you can always add more later).
Set the Top Margin to 0.72 in, Inside to 0.75 in, Bottom to 0.7 in, and Outside to 0.5 in.
Unless you are planning to add background color to the inside pages of your book, you won’t need a bleed, so leave this at 0 in for now.

Then click Create.

Step 2
Expand the Pages panel (Window > Pages) and click on the A-Master icon at the top to bring it up on screen.
Pull out two guides from the left-hand ruler (View > Show Rulers), dropping them at the two margin lines on the right-hand page.

Pull out a third guide to the center-point between the margins, at roughly 7.62 in.

Step 3
From the top ruler, pull down a guide to 2.0839 in.

Then pull down a second to 3.1967 in.

Step 4
Use the Type Tool (T) to create a text frame on the right-hand page, resting the top edge against the guide you’ve just created and letting the other edges meet the margins on the bottom, left, and right sides.

Create a second text frame along the bottom of the right-hand page, centering it on the vertical guide.

Place your type cursor into the frame and head up to Type > Insert Special Character > Markers > Current Page Number.
Select the text frame and, from either the top Controls panel or the Character and Paragraph panels (Window > Type & Tables > Character / Paragraph), set the Font to George Sans Regular, Size 10 pt, and Align Center.

Step 5
On the A-Master icon in the Pages panel, Right-Click > Master Options for “A-Master”.

Adjust the Name to Opening Page of Chapter and click OK.

Step 6
Choose New Master from the Pages panel’s main menu.

Name this second master Body of Chapter, before clicking OK.

Step 7
Select the page number text frame on the A-Master and Edit > Copy it.
Click on the B-Master icon and Edit > Paste in Place the frame onto the right page.

Paste again, and move this copy over onto the left-hand page of the B-Master.

Step 8
Create a text frame on the left-hand page, using the margins to guide its dimensions.

Then click on the small white square symbol at the bottom-right corner of the text frame and click once onto the facing page, to create a second linked text frame.

Create a text frame for a running header across the top of the left-hand page on the B-Master, setting the Font to George Sans Regular, Size 9 pt, and Align Center.

Copy and Paste the header frame, and move over to the top of the right-hand page.

Step 9
Click on the Page 5 icon in the Pages panel, and Right-Click > Numbering & Section Options.

Check Start Page Numbering at and set this to 1. Choose 1, 2, 3, 4… from the Style menu below, before clicking OK. When the warning message is flagged up, simply click OK.

Click on the icon for the very first page of the document and Right-Click > Numbering & Section Options.

As before, check Start Page Numbering at, and set this to 1. This time, choose i, ii, iii, iv… from the Style menu, before clicking OK.

Step 10
Right-Click on the [None] master icon at the very top of the Pages panel, and select Apply Master to Pages.

In the To Pages box, type in 2-4, and click OK.

Right-Click on the B-Master icon and click on Apply Master to Pages. In the To Pages box, type in 2-4, 6-12, and click OK.

Step 11
Click on Page i to bring up the first page of the book on screen.
Use the Type Tool (T) to add text to this first page, which can list the title, author name, and publisher. Set the Font to George Sans Regular, Align Center.

Step 12
On Page ii you can create a contents page.
Create a list of chapters set in George Sans Regular, Size 12 pt, and rest these against the left margin.

Copy and Paste the text frame and switch the text to Align Right. Edit the text to read ‘X’ for now—these can be updated with page numbers later when the book is finished.

Use the Line Tool () to create connecting lines between the chapter name and page number. From the Stroke panel (Window > Stroke), set the Weight to about 1.5 pt and the Type to Japanese Dots.

Step 13
Page 1 will be the first page of the main body of your book—the first page of the first chapter.
Create a text frame with the baseline resting on the top horizontal guide. Type in ‘Chapter One’ and set the Font to George Sans Semibold, Size to 14 pt, and Align Center.

Step 14
Set your type cursor into the text frame below (this is carried over from the A-Master), and set the Font to Addington CF Regular, Size to 11 pt, and the Leading to 14 pt.
From the Paragraph panel, set the First Line Left Indent to 0.125 in.

Now you can drop in your own text, by copying and pasting text over from a Word document, for example. Or go to Type > Fill with Placeholder Text to fill up the frame for now.

Set your type cursor into the first paragraph only, and, from the Paragraph panel, increase the Drop Cap Number of Lines to 2.

Step 15
Now you can start to thread the chapter text across the succeeding pages.
Click on the white square symbol at the bottom-right of the first text frame to pick up overflowing text (your cursor will show a few lines of text in miniature). Scroll down to the next page, and click once onto the page to continue the flow.
InDesign will automatically fill the remaining pages with text frames, as these have already been set up on the B-Master.

Step 16
With the basics of your template now set up, you can use the first chapter as a model for creating further chapters. Copy and Paste pages to tag onto your document.
You might also want to add few pages for an index or bibliography to the end of your book template.
With your book template complete and ready to adapt, make sure to head up to File > Save to save it for later use.

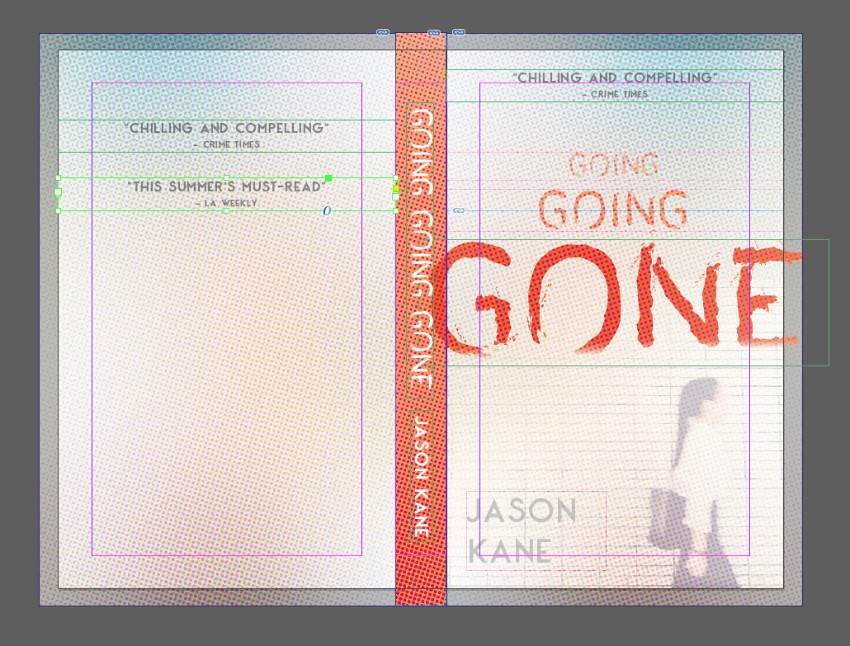
2. How to Create a Cover for Your Book Template
Step 1
In InDesign, go to File > New > Document.
Choose Print from the options at the top of the New Document window.
Set the Width of the page to 5 in and Height to 8 in. Set the Number of Pages to 3. Deselect Facing Pages.
Set the Margins to 0.5 in. Leave the Bleed value at 0 in for now.
Then click Create.

Step 2
From the Pages panel’s main menu, uncheck Allow Document Pages to Shuffle.

This will allow you to grab the Page 2 icon and ‘stick’ it to the right side of Page 1.

Then grab the Page 3 icon and ‘stick’ this to the right side of Page 2.

Step 3
Select the Page Tool (Shift-P) and click onto Page 2 to select it. Then head up to Layout > Margins and Columns.
Set the Left and Right Margins to 0 in and click OK.

This page will form the spine of your book, and the width of this will depend on the page count of your book. For now, you can give it a default width, which can be adjusted later.
From the top Controls panel, adjust the Width (W) of the page to 0.75 in.

Step 4
Expand the Layers panel (Window > Layers) and double-click on Layer 1. Rename it Photo and click OK.
Create four more new layers: Type Behind, Retro Dots, Type in Front, and finally, Barcode.

Then lock all the layers except Photo, which we’ll work on first.

Step 5
Expand the Swatches panel (Window > Color > Swatches), and choose New Color Swatch from the panel’s main menu.
Set the levels to C=4 M=98 Y=88 K=0, name the swatch Red, and click Add and Done.

Step 6
Working on the Photo layer, use the Rectangle Frame Tool (F) to create an image frame across the bottom half of Page 3 (which will be the front cover).
File > Place, choosing the woman rushing photo, and Open.

With the image frame selected, go to Object > Effects > Transparency. Bring the Opacity down to 60%.

Click on Gradient Feather in the Effects window’s left-hand menu and apply a Linear gradient, at roughly a 110 Degree Angle. Click OK to exit the window.

Step 7
Use the Rectangle Tool (M) to create a shape along the spine, setting the Fill to Red.

Step 8
Lock the Photo layer and unlock the Type Behind layer.
Create a large heading across the front cover using the Type Tool (T), setting the Font to Agave Brush and giving the text a Red swatch color.

Add more text frames above the title, using the same Font and Color, scaling the Font Size down as the text frames get higher up the cover.

Set the author’s name in the bottom left-hand corner, in George Sans Semibold.

Select all the text frames on the front cover and go to Object > Effects > Transparency. Set the Mode to Multiply and bring the Opacity down to 90%.

Step 9
Lock the Type Behind layer and unlock the layer above, Retro Dots.
Use the Rectangle Frame Tool (F) to create an image frame over the whole of the front cover. File > Place, navigate to the pack of retro dots backgrounds you downloaded earlier, choose the first image, and Open it.

Select the image frame and go to Object > Effects > Transparency. Set the Mode to Hard Light and Opacity to 65%.

Step 10
Copy and Paste the image frame, moving it over to Page 1 (the back cover).
Paste again, and readjust the width to fit over the top of the spine.
Pull out the edges of all the background elements across the three pages to create a ‘fake’ bleed. This can be added later when the artwork is exported.

Step 11
Expand the Type Behind layer in the Layers panel, and identify the large text title’s element. Click to select it, and then click on the Create New Layer button at the bottom of the panel to duplicate it.

Unlock the Type in Front layer, and drag the copy of the title up, dropping it into this layer.
Then lock the Type Behind layer.

Step 12
Add text frames to the spine of the cover, on the Type in Front layer.
To rotate text frames, Right-Click > Transform > Rotate 90 Degrees CW.

Step 13
Add a review or teaser text to the top of the front cover, set in George Sans Bold.

Add copies of these to the back cover too.
You can also add a blurb to the back cover, setting the Font to George Sans Bold, Size 10 pt.
You can place an optional barcode on the bottom of the back cover, on the Barcode layer. Use the Rectangle Frame Tool (F) to create a frame, and File > Place your barcode image.

Conclusion: Your Finished Book Template
With the basics of your book template in place, you can now File > Save your work and use the two documents you’ve created as a foundation for creating your own unique paperback book layout designs.

Still unsure about how to start with creating your own book templates? A downloadable InDesign template is a sensible place to get started, and can be great for boosting your confidence when you’re dipping a toe into book design.
You can find a wide range of customizable InDesign book templates for book covers and book layout designs on Envato Elements and GraphicRiver.
Discover our pick of the best book design tutorials for beginners below:
-
15+ Best Book Covers to Design Online With a Maker App
-
Learn How to Design a Book Cover in Our Latest Course
-
Design a Hardback Cover
for a Young Adult Fiction Book in Adobe InDesign -
New Course: Designing Covers for Children’s Books
-
Back to School: Design for Self-Publishing
-
Design a Crime Thriller Book Cover in Adobe InDesign
-
How to Create a Page Layout for a Children’s Book in InDesign
-
How to Make a Booklet in InDesign
-
How to Make a Cookbook Template in InDesign
-
How to Make a Book Layout Template in InDesign


Originally published on this site: Envato Tuts+ Tutorials
Trust you found that useful content that they shared. You can find quite similar content on our main website: https://designmysite1st.com
Let us have your reaction just below, write a short comment and let us know which things you want us to cover in up coming articles.