
Web design tips.
Yet another post freshly posted courtesy of Envato Tuts+ Tutorials. Very likely one of the most helpful generators of free content online.

Pyrophobia is an inordinate fear of or hatred of fire. This tutorial will show you how to use Photoshop’s Flame filter, along with some flame, smoke, and spark image textures as well as blending options, filters, and adjustment settings, to create a blazing, fiery text effect. Let’s get started!
This text effect was inspired by the many Layer Styles available on GraphicRiver. For example, there is this awesome fire text effect action for Photoshop, which you can apply to create a fire photo effect or flaming text effect in seconds:

Tutorial Assets
The following assets were used during the production of this tutorial:
- Aller Light font
- Flames0032 Images
- Flames0036 Images
- Flames0043 Images
- Smoke Images
- Fireworks0023 Images
- Fireworks0017 Image 2 – Medium
1. How to Create Background and Text Layers
Step 1
Create a new 1200 x 850 px document, click the Create new fill or adjustment layer icon at the bottom of the Layers panel, choose Solid Color, and use the Color #1e100c.

Step 2
Create the text in All Caps using the font Aller Light. Set the Size to 350 pt and the Tracking to 100.

2. How to Create a Stroke Path and Layer
Step 1
Right-click the text layer and choose Create Work Path.

Step 2
Hide the text layer by clicking the eye icon next to it, and create a new layer with the name Stroke Flames.

3. How to Use the Flame Filter
Step 1
Go to Filter > Render > Flame, and click OK if you get a message telling you that the path is long.
Next, you’ll be playing around with the different options and settings’ values to stroke the path with flames, until you get an outcome you like.
The values used here are:
Basic
- Flame Type: 2. Multiple Flames Along Path
- Length: 115
- Check the Randomize Length box.
- Width: 35
- Interval: 50
- Check the Adjust Interval for Loops box.
- Quality: High (Slow)

Advanced
- Turbulent: 35
- Jag: 20
- Opacity: 50
- Flame Lines (Complexity): 29
- Flame Bottom Alignment: 20
- Flame Style: 2. Violent
- Flame Shape: 5. Pointing
- Check the Randomize Shapes box.
Click OK to apply the filter. It might take some time, so just wait a little bit for it to be rendered.

Step 2
When you like the outcome, pick the Direct Selection Tool (A) and hit the Return key to get rid of the work path.

4. How to Create a Texture Overlay Layer
Step 1
Create a new layer on top of the Stroke Flames layer, name it Flame Texture, and fill it with White.
Make sure to set the Foreground and Background Colors to Black and White.

Step 2
Right-click the Flame Texture layer and choose Convert to Smart Object.

Step 3
Right-click the Flame Texture layer again and choose Create Clipping Mask.

Step 4
Go to Filter > Render > Clouds.

5. How to Create a Texture Using Filters
Step 1
Go to Filter > Filter Gallery to apply the following Filters:
Sketch > Bas Relief
- Detail: 13
- Smoothness: 3
- Light: Bottom

Step 2
Click the New effect layer icon in the bottom right corner to add another filter, and apply Bas Relief with the same values again.

Step 3
Add another new effect layer.
Brush Strokes > Spatter
- Spray Radius: 10
- Smoothness: 5
Click OK when done.

6. How to Adjust a Layer’s Blending Options
Step 1
Change the Flame Texture layer’s Blend Mode to Soft Light.

Step 2
Double-click the Flame Texture layer to adjust its Blending Options. We are going to adjust the This Layer sliders under the Blend If section.
Press-hold the Option key, and click-drag the right slider to split it. As you move the slider’s ends, you’ll notice how the texture starts to blend better with the flames.
What this slider does is prevent the lighter areas of the texture from interacting with the content below it.

Step 3
Try different values until you like the outcome.
We will get back to the texture at the end of the tutorial to blur it, so you can also modify the values some more then.

7. How to Add Flame Images
Step 1
Use any of the flame images from the Flames0032, Flames0036, and Flames0043 sets to add to the text.
It is better to add the images as Smart Objects so that you can apply changes to them non-destructively.
To do so, go to File > Place Linked, and open the image you want to add.

Step 2
Change the image layer’s Blend Mode to Screen.

Step 3
Press Command-T to enter the Free Transform Mode, and move, resize, and rotate the image to place it over a part of the text.
Hit the Return key to commit the changes.
Step 4
Go to Image > Adjustments > Hue/Saturation, and change the Hue to 3 and the Saturation to -35, or use any other values to match the color of the image’s flame with the stroke’s flame color.

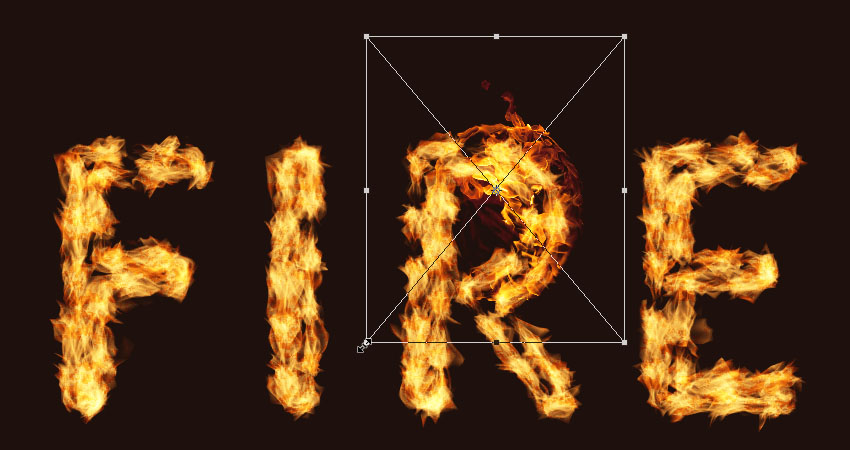
8. How to Add More Flames
Step 1
Place another flame image over another part of the text, change its layer’s Blend Mode to Screen, and transform it as needed.
To duplicate the adjustments, expand the first flame image layer’s filter list, press-hold the Option key, and click-drag the Smart Filters tab to the newly added image layer.

Step 2
Repeat the steps to add as many flame images as needed to the text.
Step 3
Place all the flame image layers in a group and name it Flames.

9. How to Add Light Smoke Images
Step 1
Add any of the smoke images you like as a Smart Object, and change its layer’s Blend Mode to Screen.
Place the smoke image over a part of the text, and transform it as needed.

Step 2
Press Command-U to adjust the Hue/Saturation. Check the Colorize box, and change the Hue to 215, the Saturation to 25, and the Lightness to -60.

Step 3
Double-click the smoke image layer to adjust its Blending Options. This time, we are going to adjust the Underlying Layer sliders under the Blend If section.
Press-hold the Option key, and click-drag the right slider to split it. As you move the slider’s ends, you’ll notice how the smoke image starts to blend better with the text and the background.
What this slider does is protect the lighter areas of the text from being affected by the smoke texture.

Step 4
Right-click the smoke image layer and choose Copy Layer Style.

Step 5
Add more smoke images to the text, and for each new image you add, right-click its layer and choose Paste Layer Style.
You can also duplicate the Hue/Saturation adjustments the same way you duplicated them for the flame images.
Double-click the Hue/Saturation tab under the Smart Filters list to use different values depending on the image you add and the effect you want.
Repeat the same steps until you like the outcome.

Step 6
Place all the smoke image layers in a group and name it Smoke, and change the group’s Opacity to 85%, or any value you like.

10. How to Add Heavy Smoke Images
Step 1
We are going to add more smoke images to create more depth.
So add a new smoke image, change its layer’s Blend Mode to Lighter Color, place it over any part of the text, and transform it as needed.

Step 2
Add a few more smoke images using the same Blend Mode, and keep them a little bit smaller in size than the lighter ones.

Step 3
Place all the new smoke image layers in a group and name it Smoke 02, and change the group’s Opacity to 50%, or any value you like depending on the effect you want.

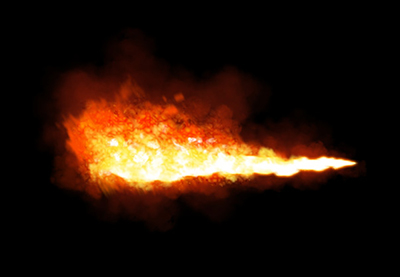
11. How to Add Sparks
Step 1
Place one of the Fireworks0023 images over any part of the text, change its layer’s Blend Mode to Linear Dodge (Add), and transform it as needed.

Step 2
Repeat the same steps to add more sparks all over the text.

Step 3
Place all the spark image layers in a group and name it Sparks.

12. How to Create an Outer Glow
Step 1
Press-hold the Option key, and click-drag the Stroke Flames layer downwards to create a copy below the original.

Step 2
Rename the copy layer to Glow, right-click it, and choose Convert to Smart Object.

Step 3
Go to Filter > Blur > Gaussian Blur, and set the Radius to 25.

Step 4
Change the Glow layer’s Blend Mode to Hard Light and its Opacity to 25%.

13. How to Add Smoke to a Background
Step 1
Place a new smoke image on top of all layers and change its layer’s Blend Mode to Screen.
Resize the image to fill one side of the document.

Step 2
Press Command-U to adjust the Hue/Saturation. Check the Colorize box, and change the Hue to 215, the Saturation to 25, and the Lightness to -83.
Keep in mind that these values are the ones used in the tutorial, but you can always tweak them to suit your work and images.

Step 3
Go to Filter > Blur > Gaussian Blur, and set the Radius to 6. The aim here is to create a subtle foggy effect all around the text.

Step 4
Repeat the same steps to add a couple more smoke images.

Step 5
You can also add some more behind the text.

14. How to Add a Background Texture
Step 1
Place the Fireworks0017 – Image 2 texture on top of the Solid Color layer, and change its layer’s Blend Mode to Linear Dodge (Add) and its Opacity to 50%.
Transform the texture as needed to fill the background.

Step 2
If you want to get rid of any parts of the texture, click the Add layer mask icon at the bottom of the Layers panel, and make sure to select the mask’s thumbnail.

Step 3
Set the Foreground Color to Black, pick the Brush Tool, and choose a soft round tip. Paint over any areas you want to erase.

15. How to Apply Final Adjustments
Step 1
Click the Create new fill or adjustment layer icon at the bottom of the Layers panel and choose Color Lookup.
Choose FoggyNight.3DL from the 3DLUT File menu, and change the layer’s Opacity to 10%.

Step 2
Select the Flame Texture layer, and go to Filter > Blur > Gaussian Blur and set the Radius to 3 so that the texture is not as harsh.

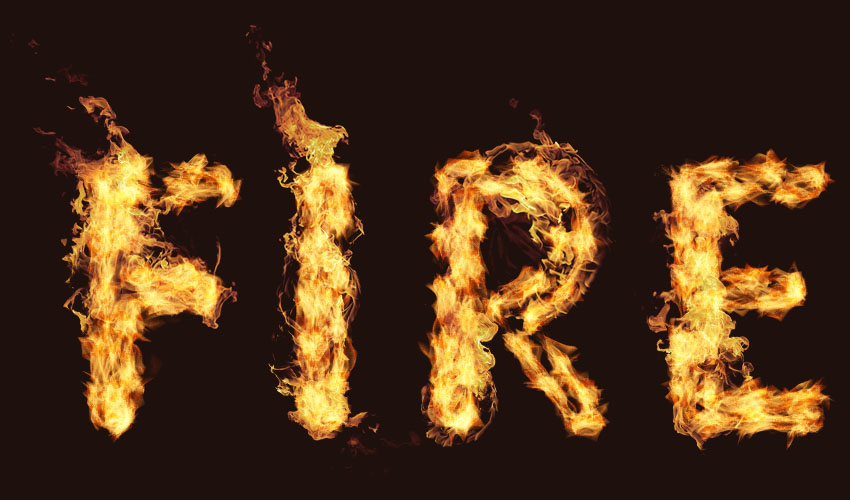
Congratulations! You’re Done
In this tutorial, we created a text work path and stroked it with flames using the Flame filter. Then, we started adding flame, smoke, and spark image textures to build up the effect. We also used blending options, filters, and adjustments to better blend everything together. Finally, we added the background and some finishing touches to finish off the effect.
Please feel free to leave your comments, suggestions, and outcomes below.

Looking to learn more? Check out these awesome fire effect tutorials:
-
 BrushesHow to Create a Fireball Brush From Scratch in Adobe Photoshop
 -
Photo ManipulationHow to Create an Emotional Fire Scene Photo Manipulation in Adobe Photoshop
-
Photo ManipulationHow to Create a Fantasy Flaming Deer With Adobe Photoshop
-
Digital PaintingHarness the Elements: Paint Fire in All Its Forms
-
Photo ManipulationHow to Create an Emotional, Molten, Shattered Statue in Photoshop


Originally seen on this site Envato Tuts+ Tutorials
Hope you enjoyed that information that they provided. You will discover related articles or blog posts on our main website: https://www.designmysite1st.com/
Leave me your views below, share a quick comment and let us know which things you want us to cover in future blog posts.