
Web design news.
The next post was published courtesy of Envato Tuts+ Tutorials . I usually look forward to reviewing 1 of their articles or blog posts because they’re surprisingly informative. I think you will find it interesting.

Text effects and Photoshop text styles can be a lot of fun—they can be expressive, dynamic, and communicative! In this tutorial, we’ll create a rainbow text effect in Adobe Photoshop, using text effects, layer styles, and some other tricks, too!
Tutorial Assets
The following assets were used in this tutorial:
- Paladise Font & Extras
1. How to Arch Text in Photoshop
Step 1
First, begin with a New Document in Adobe Photoshop. You’re welcome to follow along with my settings, as shown below, but there is no wrong answer here! Choose a size that you prefer.

Step 2
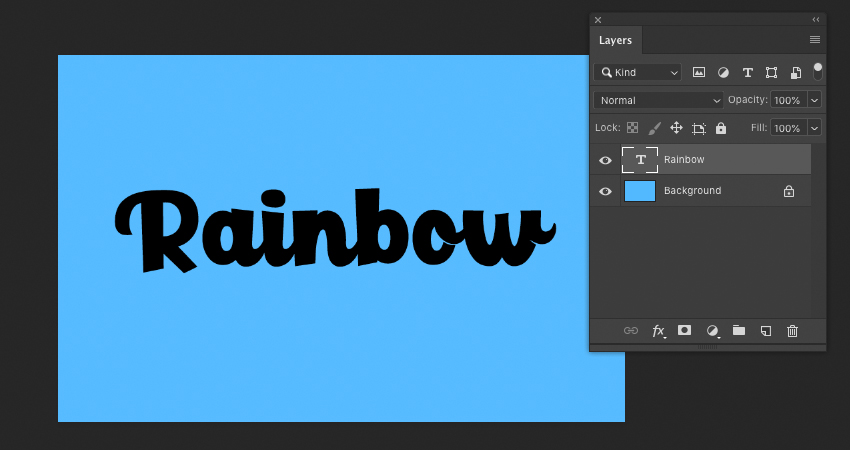
Now, let’s begin with our text. Using the Type Tool, write out the word of your choice.
I used the word “Rainbow” for this tutorial, but feel free to use any that you like. The techniques we’ll use in this walkthrough could apply to any typeface of your choice, as well.
I used the font Paladise.
Step 3
To push the rainbow aesthetic further, we’re going to give the type an arch.
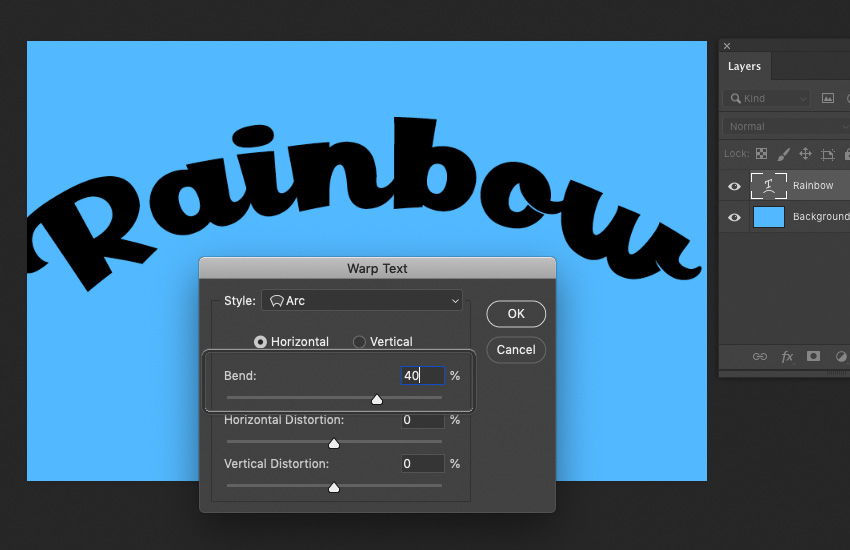
Ever wondered how to curve text in Photoshop? With the Type Tool selected, choose Create Warped Text from the Options Bar. Doing so will bring up the dialog box displayed below.
We want to apply an Arc to our text. Select Horizontal and experiment with the values until you get a curvature that you like. Voila, you know how to arch text in Photoshop! In this case, I chose to set the Bend to 40%.
Step 4
After warping the text, the type might not fit your canvas the way it did prior. In my case, it stretched things out and made the text bigger than I’d originally wanted the text design. Use the Move Tool and your Transform Controls to adjust the type, if necessary.

2. How to Create the Rainbow Text Effect
Step 1
Now, let’s create the rainbow itself. There’s no right or wrong way to do this, but here is one way you could try.
Start by using the Ellipse Tool to create a rounded shape. Try to follow the curvature of the type.

Step 2
Copy the ellipse and Move it upwards, changing its color each time. Once I was happy with my colors, I Flattened the ellipses onto one layer.
The red, however, needs to cover more space, to fully cover the top of the type. In this case, I created a New Layer beneath my ellipses and simply created a red rectangle. You could do this with your Shape Tools or simply Fill a selection made with your Selection Tools.
Again, this is a case where this could be achieved in many ways. You could, for example, draw the rainbow by hand with a drawing tablet, or you could use the Pen Tool to achieve a similar effect.
Choose the method you prefer—the important part is that the arc of the rainbow is inspired by the type and that the color completely covers the text area.

Step 3
Once you’re happy with your rainbow, make sure it has all been Flattened onto one Layer. We’re going to Create a Clipping Mask on this Layer.
To do so, Right-Click on the layer (on PC) or Control-Click on the layer (on Mac) to open the Options seen below. Select Create Clipping Mask.

Step 4
Tah dah! Our rainbow has now been applied to the type area. Notice how, when the Clipping Mask is applied, the Layer has a little downwards arrow on it, indicating this.
If you’re unhappy with how your rainbow looks, you can draw directly on this Layer and the contents will still stay confined to the type area. Don’t be afraid to go in and make adjustments!

3. How to Add Text Effects
Step 1
Now, let’s add some fun effects to push the aesthetic here further.
Rather than using the Drop Shadow Layer Effect, here in Photoshop, let’s create one by hand.
First, I took our Text Layer and the Clipping Mask Layer and put them into a Folder. This will help keep things organized.
Copy the folder. I labeled these two folders “Rainbow Text Top” and “Rainbow Text Bottom”. The bottom folder is the start of our Drop Shadow. Use the Move Tool to move it downwards.

Step 2
Now, let’s create a New Layer, right above the rainbow colors applied to our text. Create a Clipping Mask on this Layer, just as we did earlier in this tutorial.
Fill this Layer with a solid, black color (or, a different color of your choice, if you’d like!). Set the Opacity to 50%—this way, we still see the rainbow colors, but they look a little darker, like a rainbow-tinted shadow.

Step 3
Next, let’s give our text some depth.
Copy the rainbow Text Layer and move this Copied Layer to the top of your list of Layers. Change the Color to white.
I have turned off visibility on my other rainbow text layers, so I can visually focus on this one (click the Eye Icons to the left of each Layer to Toggle Visibility On and Off)

Step 4
We’re going to apply two Layer Effects to the white Text Layer that we just copied. The first one is Bevel & Emboss.
Feel free to copy my settings, as shown below—but again, there is no wrong answer here. Experiment so you get a feel for what the values do! It is, however, important to note that the Highlight Mode is set to Screen and the Shadow Mode is set to Multiply.

Step 5
Now, let’s also add an Inner Glow. Again, I recommend experimenting with these values to get a feel for what they do (Tip: Keep Preview checked so you can see what changes these values make, in real time). Note that the Blend Mode is set to Screen.
Once you’re happy with the values you’ve selected, click OK.

Step 6
Change the layer’s Blending Mode to Multiply. Notice how the white text disappears into the background, but we’re still left with visible Layer Effects.

Step 7
Toggle the visibility on for any hidden layers, so we can see everything together now.
Use the Move Tool to adjust the position of the layer with our Layer Effects, as necessary. I bumped it a little upwards and to the side to get the effect I wanted.

4. How to Create Background Elements
Step 1
To push the rainbow aesthetic even further, I thought it would be cute to add in some raindrops.
I used a drawing tablet to draw some white lines with the Brush Tool. The default Soft Round Brush will do! Then, in varied spots, I drew little spots and dashes to resemble splashes, where the raindrops hit the letters.
If you don’t have a drawing tablet, that’s okay too! The artwork itself doesn’t have to be perfect—you could use your mouse or the Line Tool, for example, to get the basic shapes down.
Then, apply a Gaussian Blur (located under Filters > Gaussian Blur) to smooth things out and match the hazy white glow at the type of the type. Now, we have a rainy look!

Step 2
Let’s finish things off with a fun background.
First, on a New Layer below all of the type, I created some simple clouds in a solid, white color. Again, I used my drawing tablet and the Brush Tool to do so—but you could use Shape Tools to achieve a similar result.
I also added a Gradient, below. The goal was to make the base of the background a little darker than the top. You can do so with the Gradient Tool.

Step 3
Finally, Copy the clouds and Move them so they create a repeated pattern. It doesn’t have to be perfect or symmetrical! Once you’re happy with where you’ve placed them, apply a Gaussian Blur and lower the Opacity of the layer to 80%.

And There You Have It!
We’ve created a cartoon rainbow text effect in Adobe Photoshop! Photoshop text effects aren’t as tough as they look, right? I hope these techniques benefit your next project.
Thank you for following along, and I hope you enjoyed this tutorial!

If you enjoyed this tutorial, here are some others to check out!
-
 Text EffectsHow to Warp Text in Adobe Photoshop
 -
Text EffectsHow to Create a Coconut Text Effect in Adobe Illustrator
-
Text EffectsHow to Create a Cartoon Gradient Text Effect in Adobe Photoshop
-
Text EffectsHow to Create a Cartoon Text Effect in Adobe Photoshop
-
Text EffectsHow to Create a Fun Felt Photoshop Text Effect


Originally posted here Envato Tuts+ Tutorials
Trust you found that useful content that they provided. You’ll find quite similar articles on our main site: https://designmysite1st.com
Let us have your reaction below, leave a comment and let me know what things you want us to write about in upcoming blog posts.